How To Remove Baseboard For Contemporary Kitchen With Breakfast Bar 2025 Design
How To Remove Baseboard For Contemporary Kitchen With Breakfast Bar 2025 Design
The kitchen is the heart of the home, and in 2025, that heart is likely beating with a contemporary rhythm. Sleek lines, minimalist design, and integrated technology will define the modern kitchen. If you’re renovating to achieve this aesthetic, especially when incorporating a breakfast bar, you’ll often need to remove existing baseboards. This isn’t just about tearing off trim; it’s about setting the stage for a clean, refined look. This article will provide a detailed, step-by-step guide on how to remove baseboards properly for your contemporary kitchen renovation, focusing on the considerations relevant to a modern design incorporating a breakfast bar.
Why Remove Baseboards in a Contemporary Kitchen Renovation?
Before diving into the "how," let’s understand the "why." In a contemporary kitchen design, baseboards often need to be removed for several reasons:
Clean Lines and Minimalism: Contemporary design emphasizes simplicity and clean lines. Old, ornate baseboards can clash with this aesthetic, appearing outdated and bulky. Removing them allows for the installation of sleeker, more minimalist baseboards, or even a seamless transition between the wall and floor.
Flooring Updates: New flooring is a common element in kitchen renovations. If you’re installing new tile, hardwood, or luxury vinyl plank (LVP), the existing baseboards may not be the correct height or style to complement the new flooring. Removal is necessary for a flush, professional finish.
Cabinet and Appliance Installation: When installing new cabinets, particularly base cabinets or appliances like dishwashers and refrigerators, the baseboards may interfere with proper placement and leveling. Removing them ensures a perfect fit.
VIEW PRODUCT ADD TO CARTBreakfast Bar Integration: A breakfast bar is a focal point in many contemporary kitchens. Removing the baseboard where the bar meets the wall allows for a clean, integrated look. The bar’s supports can then sit flush against the wall, enhancing the minimalist design. You might also be adding outlets, and the new baseboard must accommodate the changes in the wall.
Concealing Wiring and Plumbing: Modern kitchens often incorporate under-cabinet lighting, integrated appliances, and smart home technology. Removing baseboards can provide access for running wiring or plumbing, which can then be concealed behind the new baseboards or within the wall itself.
VIEW PRODUCT ADD TO CART


Planning and Preparation: The Key to Success
Proper planning is essential for a successful baseboard removal project. Rushing into it can lead to damaged walls, broken baseboards, and unnecessary frustration.

VIEW PRODUCT ADD TO CARTAssess the Existing Baseboards:
- Material: Determine the material of your existing baseboards. Are they wood, MDF (Medium-Density Fiberboard), or something else? This will influence the tools and techniques you use.
- Attachment Method: How are the baseboards attached? Are they nailed, glued, or both? Nails are easier to deal with than glue.
- Paint or Finish: Note the type of paint or finish on the baseboards. This will be important when touching up the walls after removal.
- Condition: Assess the condition of the baseboards. Are they cracked, warped, or damaged? This will determine if they can be salvaged and reused elsewhere.
- Length & Cuts: Measure the lengths of the baseboards and the angles of any corner cuts. This will be helpful if you plan to replace them with new baseboards.
Plan Your Contemporary Kitchen Design:
- New Baseboard Style: Choose the style of baseboard you’ll be installing. Consider a simple, flat profile for a truly contemporary look. Alternatively, a very subtly curved profile can add a touch of softness.
- Height and Thickness: Determine the height and thickness of the new baseboards. Ensure they complement the flooring and the overall design of the kitchen. A lower profile is generally preferred in contemporary kitchens.
- Breakfast Bar Considerations: Pay special attention to the area where the breakfast bar will meet the wall. Plan how the baseboard will terminate or integrate with the bar’s supports. Consider using a scribed piece of trim to create a seamless transition.
- Outlets and Wiring: Plan for any electrical outlets or wiring that will need to be accommodated by the new baseboards. Consider running wiring before installing the new baseboards to minimize disruption.
Gather Your Tools and Materials:
- Safety Glasses: Essential for protecting your eyes from flying debris.
- Gloves: Protect your hands from splinters and sharp edges.
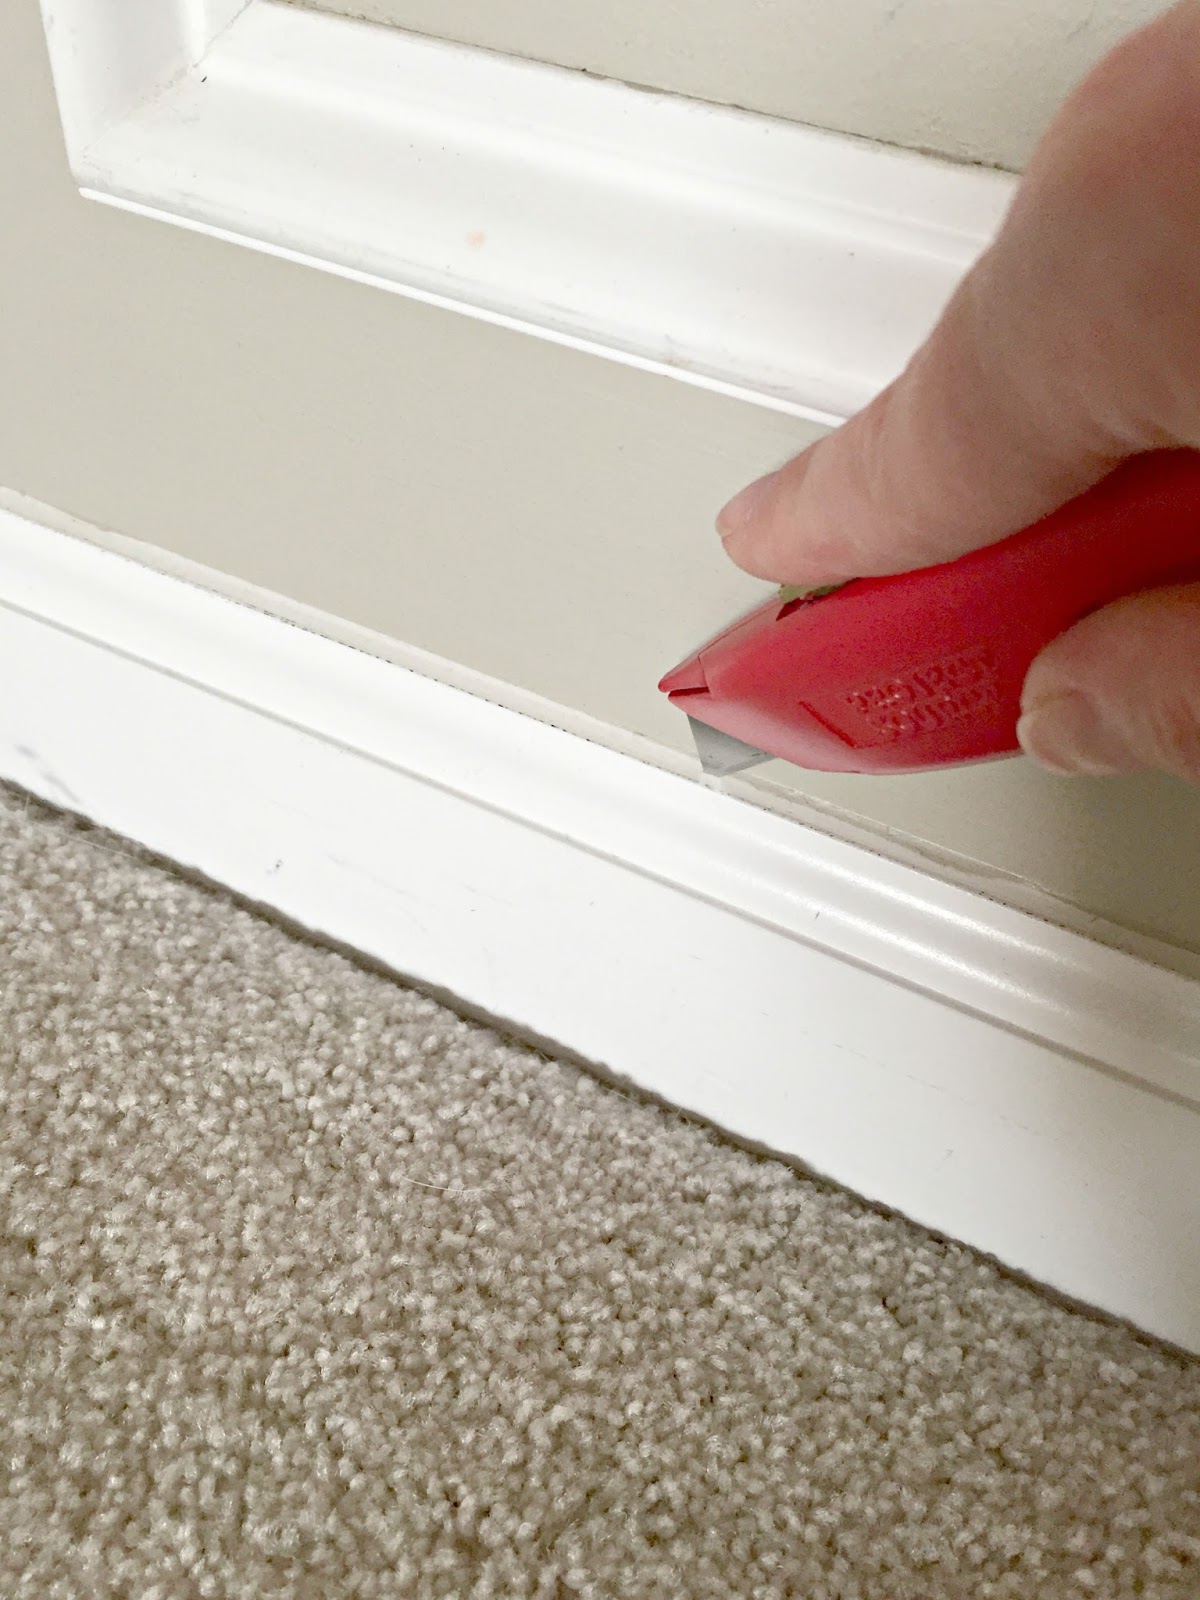
- Utility Knife: For scoring along the top edge of the baseboard to prevent paint from peeling the wall.
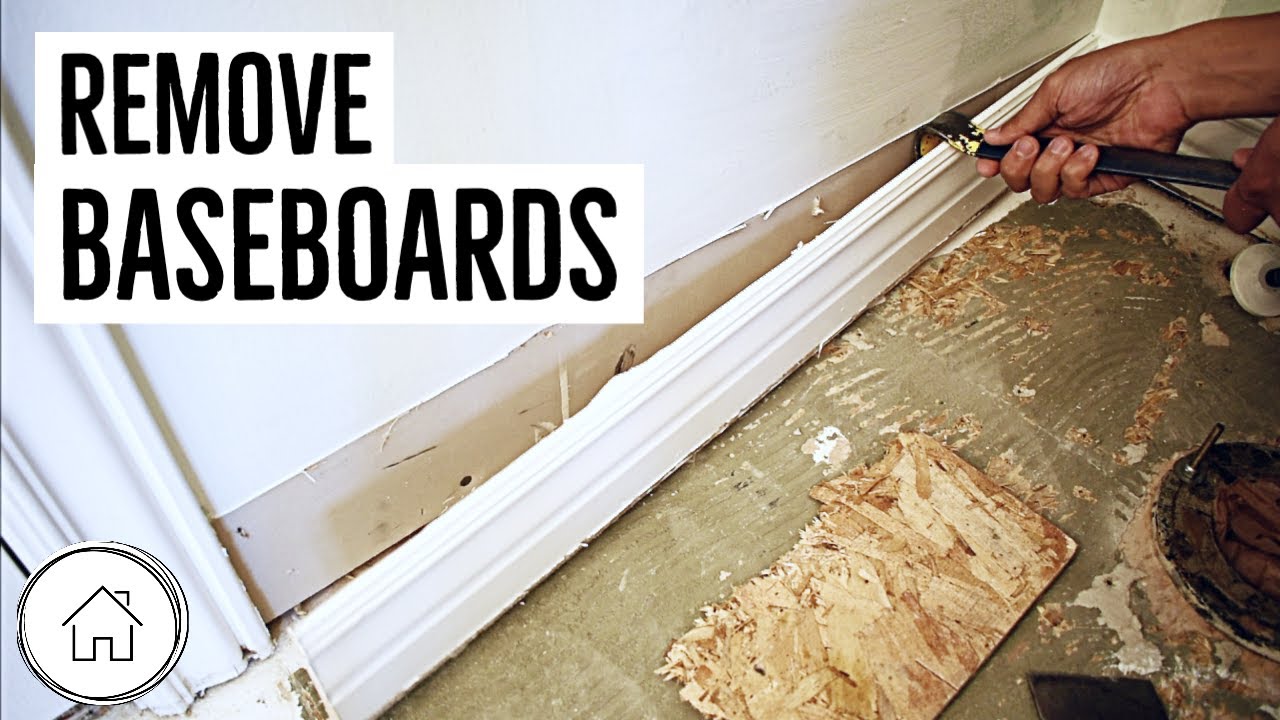
- Pry Bar (or Putty Knife): For gently separating the baseboard from the wall. A thin, flexible putty knife is good for initial separation, while a larger pry bar provides more leverage.
- Hammer: For tapping the pry bar behind the baseboard.
- Stud Finder: To locate wall studs and avoid damaging them.
- Multi-Tool with Cutting Blade (Optional): For cutting through stubborn caulk or adhesive.
- Pliers: For removing stubborn nails or staples.
- Sandpaper: For smoothing rough edges on the wall.
- Spackle or Joint Compound: For filling nail holes and imperfections in the wall.
- Primer and Paint: To match the existing wall color and touch up any damaged areas.
- Dust Mask: To protect yourself from dust and debris.
- Drop Cloths or Plastic Sheeting: To protect your floors and countertops.
Step-by-Step Baseboard Removal Process
Now, let’s get to the actual removal process. Follow these steps carefully for the best results:
Prepare the Area:
- Cover your floors and countertops with drop cloths or plastic sheeting to protect them from dust and debris.
- Open windows or turn on a ventilation system to improve air quality.
- Wear your safety glasses and gloves.
Score the Top Edge:
- Use a utility knife to carefully score along the top edge of the baseboard where it meets the wall. This will prevent the paint from peeling off the wall when you remove the baseboard. Apply firm, even pressure.
Loosen the Baseboard:
- Start at one end of the baseboard. Gently insert a thin, flexible putty knife between the baseboard and the wall.
- Tap the putty knife with a hammer to work it further behind the baseboard.
- Move the putty knife along the baseboard, gradually loosening it from the wall.
Pry the Baseboard Away from the Wall:
- Once you’ve loosened the baseboard with the putty knife, switch to a pry bar.
- Insert the pry bar behind the baseboard, close to a nail or stud.
- Gently pry the baseboard away from the wall. Use a small piece of wood or cardboard behind the pry bar to protect the wall from damage.
- Work your way along the baseboard, prying it away from the wall in small increments.
- Avoid using excessive force, as this can damage the wall or break the baseboard.
Remove Nails and Staples:
- Once the baseboard is removed, inspect it for any remaining nails or staples.
- Use pliers to carefully remove these fasteners.
- Pull the nails straight out to avoid damaging the baseboard.
Clean Up the Wall:
- Use sandpaper to smooth any rough edges or imperfections on the wall.
- Fill nail holes and other small imperfections with spackle or joint compound.
- Let the spackle dry completely, then sand it smooth.
- Prime and paint any areas where the wall was damaged.
Breakfast Bar Area Specifics:
- When removing baseboard near where the breakfast bar will be installed, pay extra attention to the wall surface.
- If you are installing a support panel or cabinet directly against the wall, ensure the wall is perfectly smooth and level.
- Consider the thickness of the bar’s countertop and how it will overhang the base cabinet. This might influence where you choose to terminate the new baseboard.
- If you are running electrical wiring for outlets or lighting under the bar, now is the time to do it.
Salvaging and Reusing Baseboards
If your existing baseboards are in good condition and you want to reuse them in another area of your home, take extra care during the removal process. Use a putty knife to carefully separate the baseboards from the wall, and avoid using excessive force. Store the baseboards in a safe place where they won’t be damaged. If you can, remove the baseboards in one long piece. That will make reuse easier.
Tips for a Contemporary Finish
- Seamless Transitions: Aim for seamless transitions between the wall, floor, and new baseboards. Use caulk to fill any gaps and create a clean, professional finish.
- Minimalist Baseboards: Choose simple, flat baseboards for a truly contemporary look. Avoid ornate or overly decorative styles.
- Color Coordination: Coordinate the color of your baseboards with the rest of your kitchen. White or light gray are popular choices for contemporary kitchens.
- Lighting: Consider incorporating LED strip lighting behind the baseboards to create a subtle, modern glow. This works particularly well under a breakfast bar.
- Integrated Outlets: Install flush-mounted outlets in the baseboards for a clean, minimalist look.
Post-Removal Considerations
- Disposal: Dispose of the old baseboards properly. Check with your local waste management company for recycling options.
- Wall Preparation: Thoroughly prepare the walls for the new baseboards. This includes cleaning, sanding, and patching any imperfections.
- Installation: Install the new baseboards with precision and care. Use a level to ensure they are straight and even.
- Finishing Touches: Caulk and paint the new baseboards for a professional finish.
Conclusion
Removing baseboards for a contemporary kitchen renovation, especially one incorporating a breakfast bar, requires careful planning, the right tools, and a methodical approach. By following the steps outlined in this guide, you can achieve a clean, modern look that complements your new kitchen design. Remember to prioritize safety, take your time, and pay attention to detail. The result will be a stunning kitchen that reflects the sleek, sophisticated style of 2025. Good luck!


Comments
Post a Comment